In this tutorial we will install tagbox on your computer and start using the API to generate tags that describe images.

The first thing we need to do is to install Docker.
To install Docker, head over to the Docker website to download Docker Community Edition for your computer.
Or pick from this list of popular operating systems:
Follow the instructions in the installer until you have Docker up and running.
Validate that Docker is indeed running by opening a terminal and doing:
docker version
You should see some output that lists various version information.
If you get an error (like docker: command not found) then the installation was not successful, and we
recommend you consult the Docker website.
Running tagbox is extremely easy, you just need to docker run the machinebox/tagbox image with the
MB_KEY environment variable configured.
Open a terminal, and do:
MB_KEY="INSERT-YOUR-KEY-HERE"
docker run -p 8080:8080 -e "MB_KEY=$MB_KEY" machinebox/tagbox
INSERT-YOUR-KEY-HERE with your actual box key-p 8080:8080 tells Docker to expose the container’s port :8080 as your local port :8080-e "MB_KEY=$MB_KEY" provides the MB_KEY environment variable to the containermachinebox/tagbox is the name of the tagbox image on Docker HubThis command will download the latest version of tagbox (if you don’t already have it) and spin up a running container.
Assuming you see no error messages, it’s time to jump into the Interactive console.
The Interactive console is the homepage for every box. You can use it to learn about the capabilities of the box, see what API calls are available, and make actual calls too.
Once your box is running, open a web browser and go to http://localhost:8080/.
You should see the latest tagbox console:

The left hand side of the page reveals the status of the box. Boxes can take a few seconds to warm up,
so wait until you see the status change to Ready before continuing.
In the Interactive console, go to the /tagbox/check endpoint section, and access the By URL tab.
Notice that the API is pretty trivial, and there is even a way to use the service right from this page.
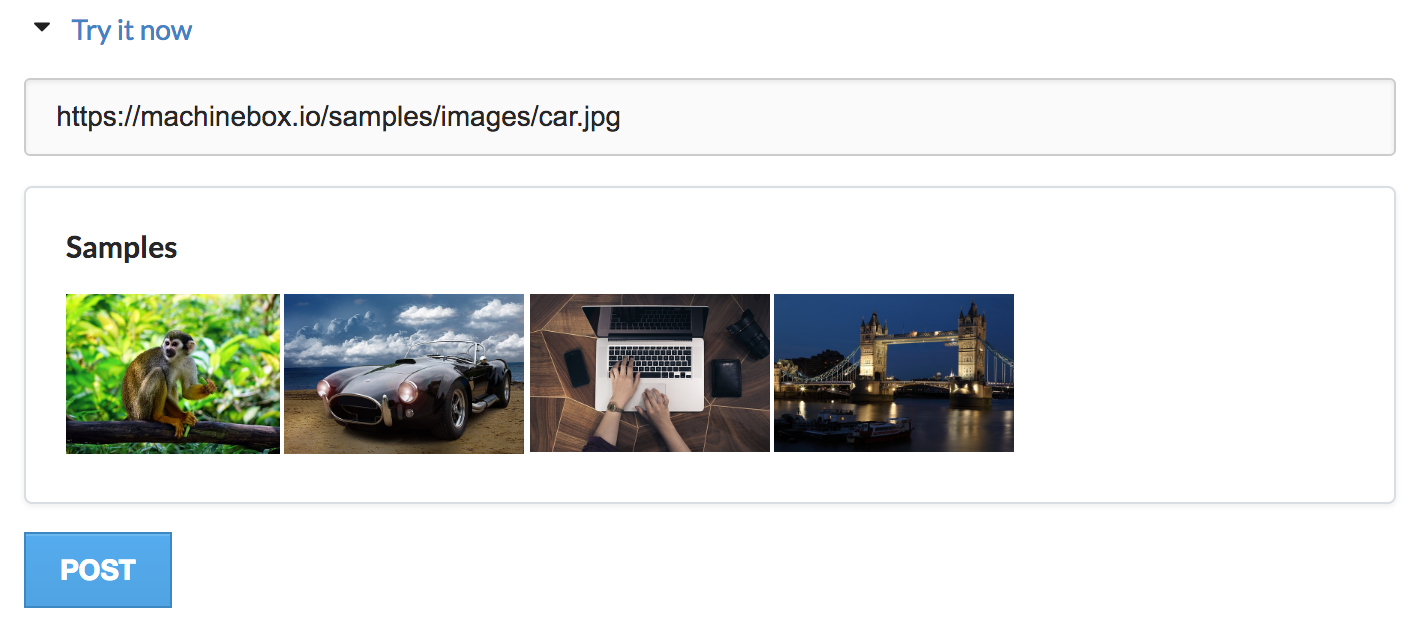
Click the Try it now link to open the panel:

Select the Car image from the Samples section, which will autofill the URL box, and click POST.
This will submit a URL to this image:

The API call looks like this:
POST /tagbox/check
{
	"url": "https://machinebox.io/samples/images/car.jpg"
}
It’s important to remember that the call is made to your locally running tagbox, the image is downloaded and analyzed and the results are returned. If you submit an image from your local hard-drive (as we do below), the data never leaves your computer.
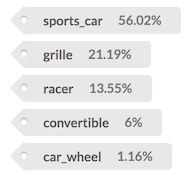
Once analysis is complete, you will be presented with the results:

The top result in this case sports_car, which is correct. Try the others too.
The actual JSON response from the API call is also displayed:
{
  "success": true,
  "tags": [
    {
      "tag": "sports_car",
      "confidence": 0.5602228045463562
    },
    {
      "tag": "grille",
      "confidence": 0.21198685467243195
    },
    {
      "tag": "racer",
      "confidence": 0.13552699983119965
    },
    {
      "tag": "convertible",
      "confidence": 0.060064539313316345
    },
    {
      "tag": "car_wheel",
      "confidence": 0.011693383567035198
    }
  ],
  "custom_tags": [
    {
      "tag": "cars",
      "confidence": 0.67,
      "id": "car1.jpg"
    }
  ]
}
The Interactive console explains what this all means, but notice that all the confidence values add up
to 1. This is because they are describing a probability.
Machine learning is never 100% sure of anything, but the results are ordered by confidence such that the most
likely answer appears first in the array.
In production we do not expect you to use the console to obtain the tags. Instead, as a developer, it is your job to integrate with the simple API endpoints to utilise the services.
Mac and other unix users can test this using the curl command.
Open another terminal window and run the following command:
curl -H 'Content-Type: application/json' -d '{"url":"https://machinebox.io/samples/images/monkey.jpg"}' http://localhost:8080/tagbox/check
This will make a RESTful JSON HTTP request to the /tagbox/check endpoint, submitting the monkey.jpg URL.
After a moment, the results will be printed to the terminal in JSON format.
Of course, tagbox performs great when you are using sample content—why would we include examples that didn’t work?
You get a real sense for what tagbox can do when you start submitting your own images, or images from around the web.
Go back up and switch to the POST the file tab, and expand the Try it now dropdown.
This time, the console will make a different kind of request to tagbox where the file data is posted directly, instead of being downloaded from a URL.
Click Choose file and select a file from your local hard drive before clicking POST.
With the last release of tagbox you are able to use your own tags, the endpoint http://localhost:8080/tagbox/teach allows you to POST any image and tag, to customize tagbox to your own needs, in your own dataset.
Using your own tags you are able to:
Check out the documentation on the console, and try it, to find out the posibilities.
If you’re using Machine Box services for free, don’t forget to include the Powered by Machine Box snippet on your website, near to where the results are being used.
You can avoid having to do this by paying for a subscription.
Now that you’ve mastered tagbox, why not see what magic you can do with facebox.